archived posts
Best FM 2014 Tactics: Screwby’s 4-3-3 (Deepfried Chicken)

Greetings fellow football managers,
My name is Carl, but a few of you may recognize me by my internet pseudonym ‘Screwby’ since one of my tactics was reviewed by Darren here on Football Manager Story last year. My tactic from Football Manager 13 was very well received from you readers. Recently some people have asked me if I’ve managed to recreate it for FM14. I’ve actually tried to recreate it more than once, without success. I really struggled with the 4-2-3-1 formation and especially the defensive aspect of the tactic and formation. I rethinked and decided to restart my project from step one and completely revamp the tactic. Instead of trying to recreate my old one, I managed to instead create something new and hopefully even better.
Here’s a link to my Football Manager 13 tactic if you wish to read it (again): 4-2-3-1 DEEP FRIED CHICKEN
First off I’m going to do a little presentation about myself and my views and approach to football and tactics in general, so you’ll hopefully get a greater understanding on what I’ve tried to create with this FM 2014 tactic.
I’m a 20 year old Swede with a passion for tactics and strategies, primarily in football but also in other sports such as hockey and even when it comes to historical and modern warfare. I’m also a vivid Manchester United supporter, but with Ferguson as a manager during my time as a supporter, the tactical approach of United haven’t really been something to hang in the christmas tree. I prefer the more radical, extreme and philosophical managers in football such as Bielsa, Klopp and Guardiola but also Pulis and his Swedish counterpart, Pelle Olsson. Therefore my influences comes from both ends of the spectrum.
A vague summarize of my personal tactical approach would be that I’m quite fond of dominating a match in an unfashionable way. The most obvious one is of course, domination in terms of possession, but it might as well be through a high tempo approach with players surging forward, overpowering the opposition in the last third of the pitch, or by physically harassing the opposition defense to alter conditions of the game to my advantage.
Now, let’s move on to the tactic, shall we?
Formation
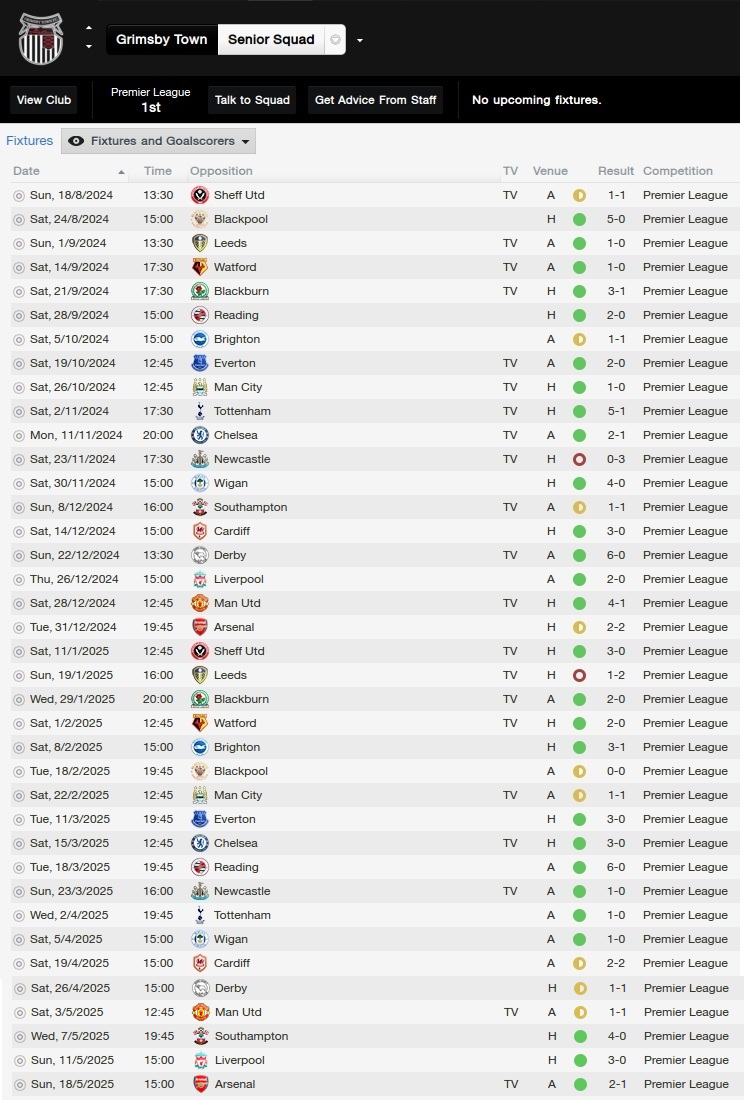
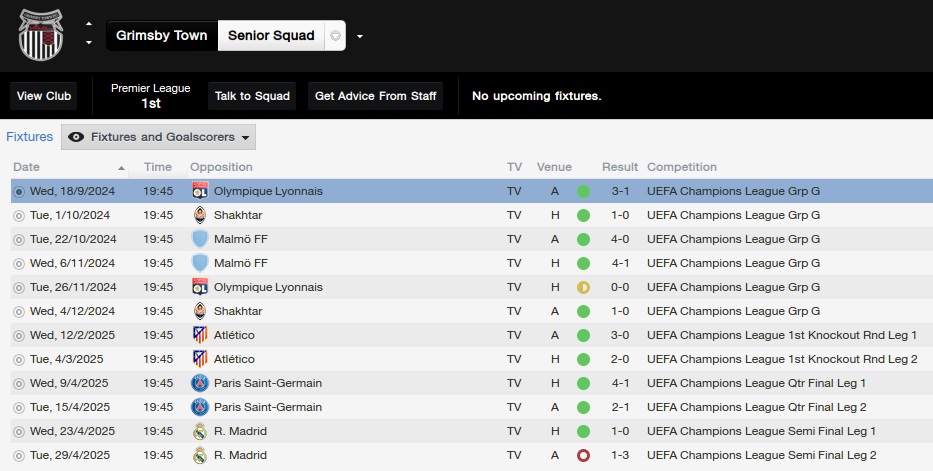
I developed this tactic throughout my save with Grimsby. I just finished the 2024/25 season, so obviously my team consists exclusively of regens.
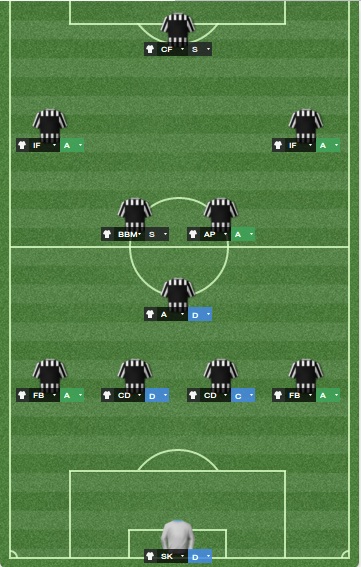
As you can see, I’m using a 4-3-3 (4-1-2-2-1) formation, one of the most common formations in modern football, especially on the Iberian Peninsula and in South America.
This may be faced with some disappointing glances, some of you probably hoped for yet another 4-2-3-1, the undoubtedly most popular formation. Well, don’t be fooled, in some cases there’s a thin line between the two formations.
I choose to change the formation for different reasons. In the 4-2-3-1 formation you can easily become too dependent of your AMC while at the same time it’s easier for the opposition team to neutralize him, whereas in my 4-3-3 the two MCs becomes kind of like a dynamic duo. They split the offensive responsibilities between the two and they’re a lot harder to neutralize for the opposition. Their deeper starting positions also means that they will face the opposition goal a lot more, whilst operating a lone AMC will result in him facing the back towards the opposition goal quite often (which reduces his effectiveness). The anchorman is also very beneficial here, he is focusing solely on defending and distributing passes to more creative players. He relieves the two MCs of their defensive responsibilities and also let the full backs surge forward when spaces are opening up.
Team Instructions
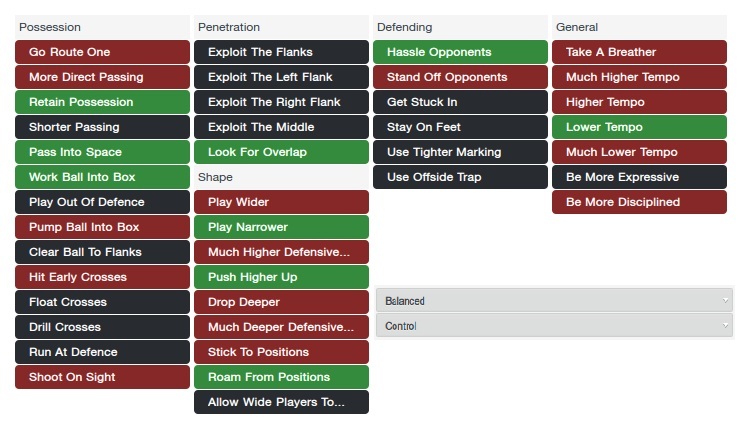
First off, I’ve chosen a balanced fluidity based on that I wish the roles of my players to define how they act on the pitch. A more fluid philosophy is in my experience also easier to break down and encourages the opposition to exploit any defensive irregularities.
The mentality I’ve chosen is ‘Control’ due to the fact that one of the most important defensive aspects of the tactic is to keep pressure on the opposition constantly. In my experience, a more cautious approach will disrupt the closing down. Even if ‘Defensive’ or ‘Counter’ seems more defensively solid, it might not be a beneficial change.
It’s obvious this tactic revolves around possession with instructions like ‘Retain Possession’, ‘Work Ball Into Box’, ‘Lower Tempo’, ‘Roam From Positions’ and ‘Push Higher Up’. Though, there’s more to this than meets the eye.
You may wonder why I use ‘Retain Possession’ rather than ‘Shorter Passing’. When using the ‘Shorter Passing’ instruction your players will be somewhat limited in terms of forward passes. They may avoid the opportunity to make a quicker forward pass into an open space, instead favoring a short pass to a closer player. When using the ‘Retain Possession’ instruction, your team will still prioritize keeping hold of the ball, but they won’t hesitate to start of a quick counter or make a more direct pass into an open space. This instruction results in more counter attacks for your team and more efficient exploits of spaces in offensive zones.
You could argue that I actually use the ‘Use Tighter Marking’ instruction. I think it’s essential to mark tighter when using a defensive system based on pressuring your opponents. In this case I’ve assigned this instruction to the individual players instead. I don’t want my two center backs and my defensive midfielder to mark tightly, instead I wan’t them to cover space and be ready for through balls behind my defensive line.
Player Roles
The roles used in this tactic is pretty much generic and defined. The player instructions I’ve changed are pretty much based on improving the closing down.
Note: I encourage all offensive players (including the MCs) to have high teamwork and work rate abilities, otherwise the closing down wouldn’t work as good.
GK — Sweeper Keeper – The duty of the keeper is pretty basic, he distributes passes to defenders. Due to the high defensive line he should also be able to rush out to clear opposition through balls behind the defense.
Player instruction: ‘Distribute To Defenders’
DR/DL — Full Back (Attack) – Acts like a modern wing back, not quite unusual. They fulfill their defensive duties but should be ready to attack and support the inside forwards further up the pitch. They are the main threat on the wings due to the inside forwards cutting inside. Should be able to cross and dribble and should also possess physical attributes such as pace, acceleration and stamina. In defense often works together with the AMR/AML to counter the opposition threat on the wings.
Player Instruction: ‘Mark Tighter’
CD — Central Defender (Cover/Defend) – Works as a unit together with the defensive midfielder, creating a defensive triangle that blocks spaces for the opposition to exploit. The closing down of the more offensive midfielders often leads to opposition long balls that needs to be headed away. Should have excellent heading attributes and at least one of the center backs (Cover Role) should be quite quick to counter through balls behind the defensive line.
Player Instruction: ‘Pass It Shorter’
DM – Anchorman – The last resort of midfield, a shield in front of the center backs. Probably the most important player when facing a team with a technical and playmaking AMC. In possession he receives the ball and distributes simple passes to more creative players up the pitch. He sometimes falls down as a third center back. Should be a quite smart player with good defensive attributes. If one of the center backs lacks authority in the air, it would be great to have some heading skills as well. More of a Leon Britton/Joe Allen/Liam Bridcutt/Xavi-type of player rather than a ball winner.
Player Instruction: ‘Pass It Shorter’
MC – Box To Box Midfielder – Not much to tell here, works in both directions. Often links together the defense and offense when in possession leading to passing triangles. Surging forward outside of the box when there is space. He is also a secondary playmaker and roams around looking for space. When not in possession he’s closing down the opposition central midfielders. I own (more than) two playmakers, I’ve assigned the one with higher defensive attributes as BBM, the other as AP. Should have good technical and creative abilities but also good work rate and stamina.
Player Instructions: ‘Close Down More’, ‘Mark Tighter’, ‘More Risky Passes’ (Not necessary. If you don’t have two creative players, this can be removed)
MC – Advanced Playmaker (Attack) – The teams primary creator, although shares this responsibility with his BBM companion. Moves around in the center of the pitch looking for space. Often plays one-twos with other offensive players. Should be creative, technical and mobile.
Player Instructions: ‘Close Down more’, ‘Mark Tighter’
AMR/AML – Inside Forwards – Contributes with a more direct display than their teammates. Creates space and chances through individual skill. Often drifts inside, dragging the opposition full backs with them, opening up spaces on the wings for the attacking full backs. Should primarily have great technical abilities, first touch is especially important due to the fact that they often receives the ball in tight areas. Pace, agility and acceleration is also essential.
Player Instructions: ‘Mark Tighter’
ST – Complete Forward (S) – Drops deep to receive ball in transitions. Drags central defenders out of position, which creates space for the inside forwards to exploit. Acts very similar to Olivier Giroud in Arsenal. Should be quite all-round, balance and strength together with a fair amount of creativity wouldn’t hurt.
Player Instructions: ‘Mark Tighter’
The Tactic in action
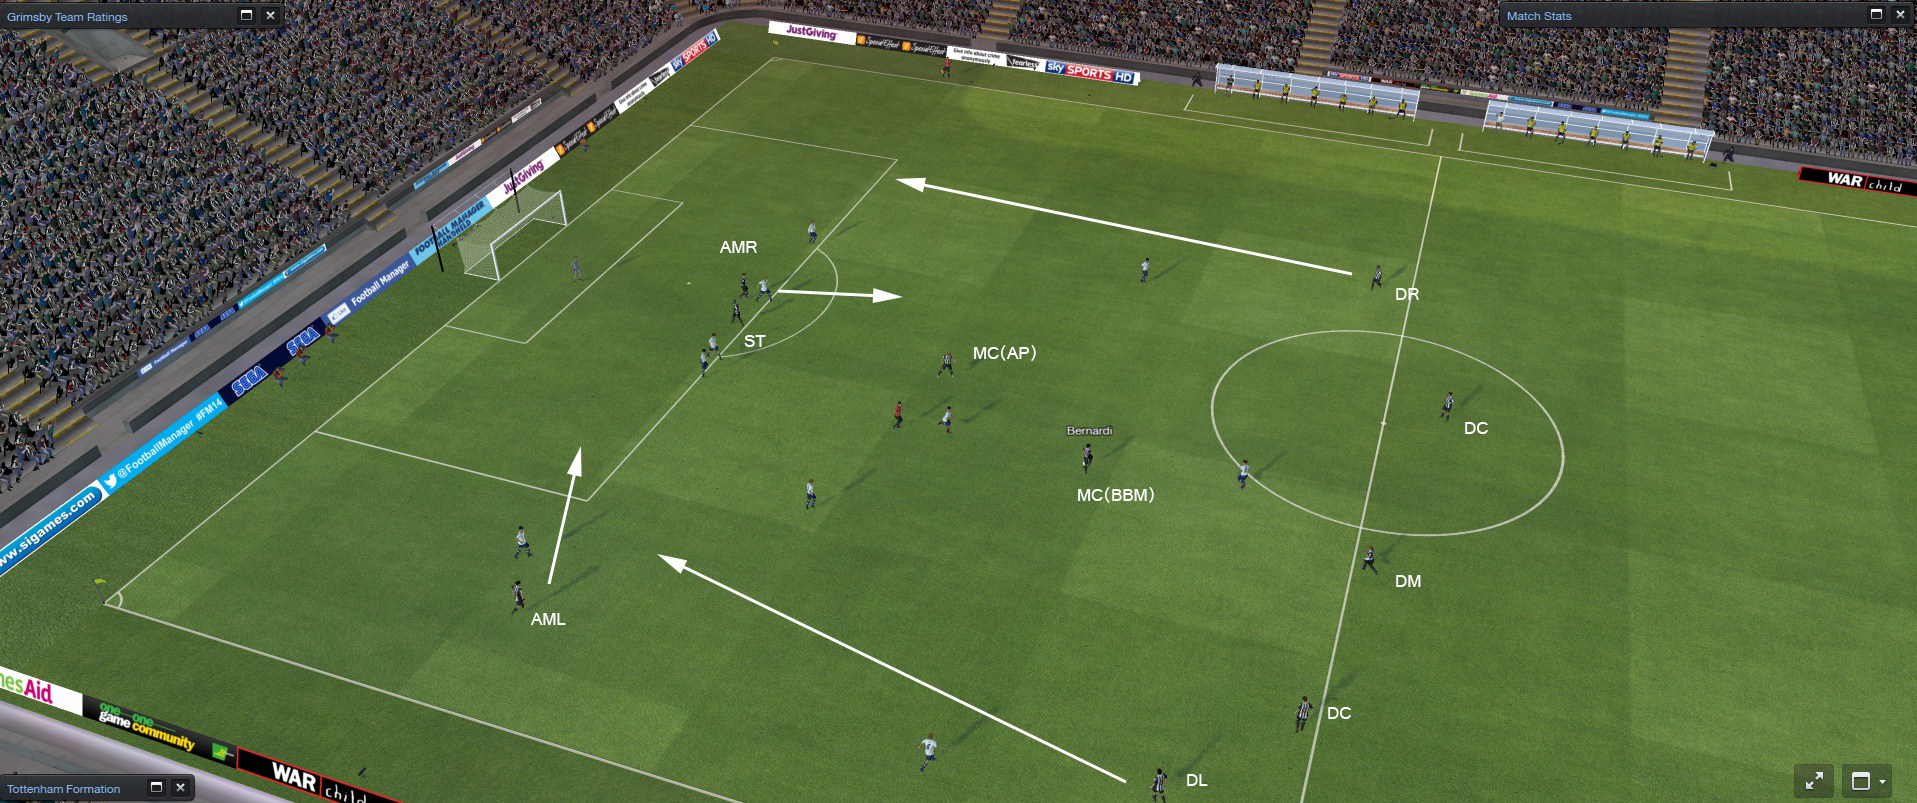
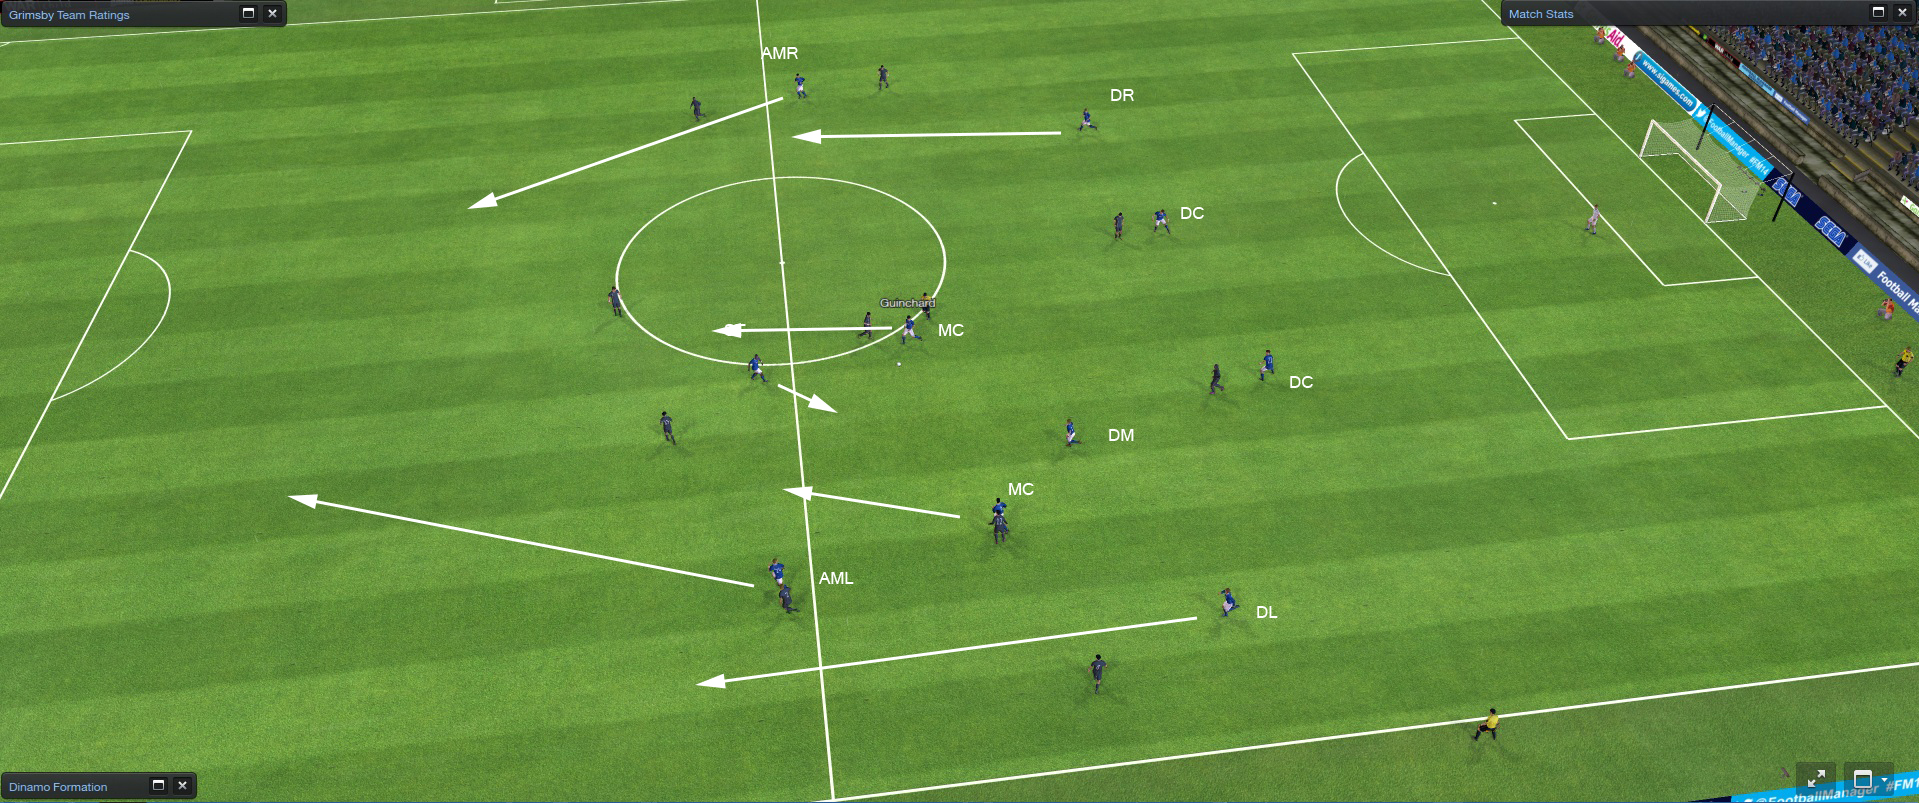
Average Positions
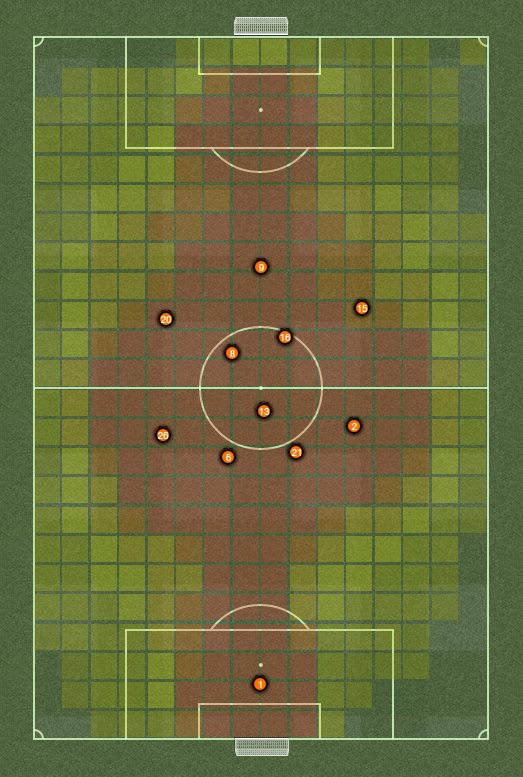
This picture is from a match against a high mid-table team in the Premier League (can’t remember which team), so we had a good amount of possession, around 60 % I reckon. As you can see, it’s pretty spot-on how I want it to look. The defensive line is really high, but when out of possession the DM and MCs falls back a bit and creates a tight block, choking spaces in the centre of the pitch. The initial fear is of course, through balls behind the defensive line, luckily I have quick defenders to pick up these passes. You can also see a good balance and unity between the two MCs, the advanced playmaker is only slightly more offensive than the box to box midfielder.
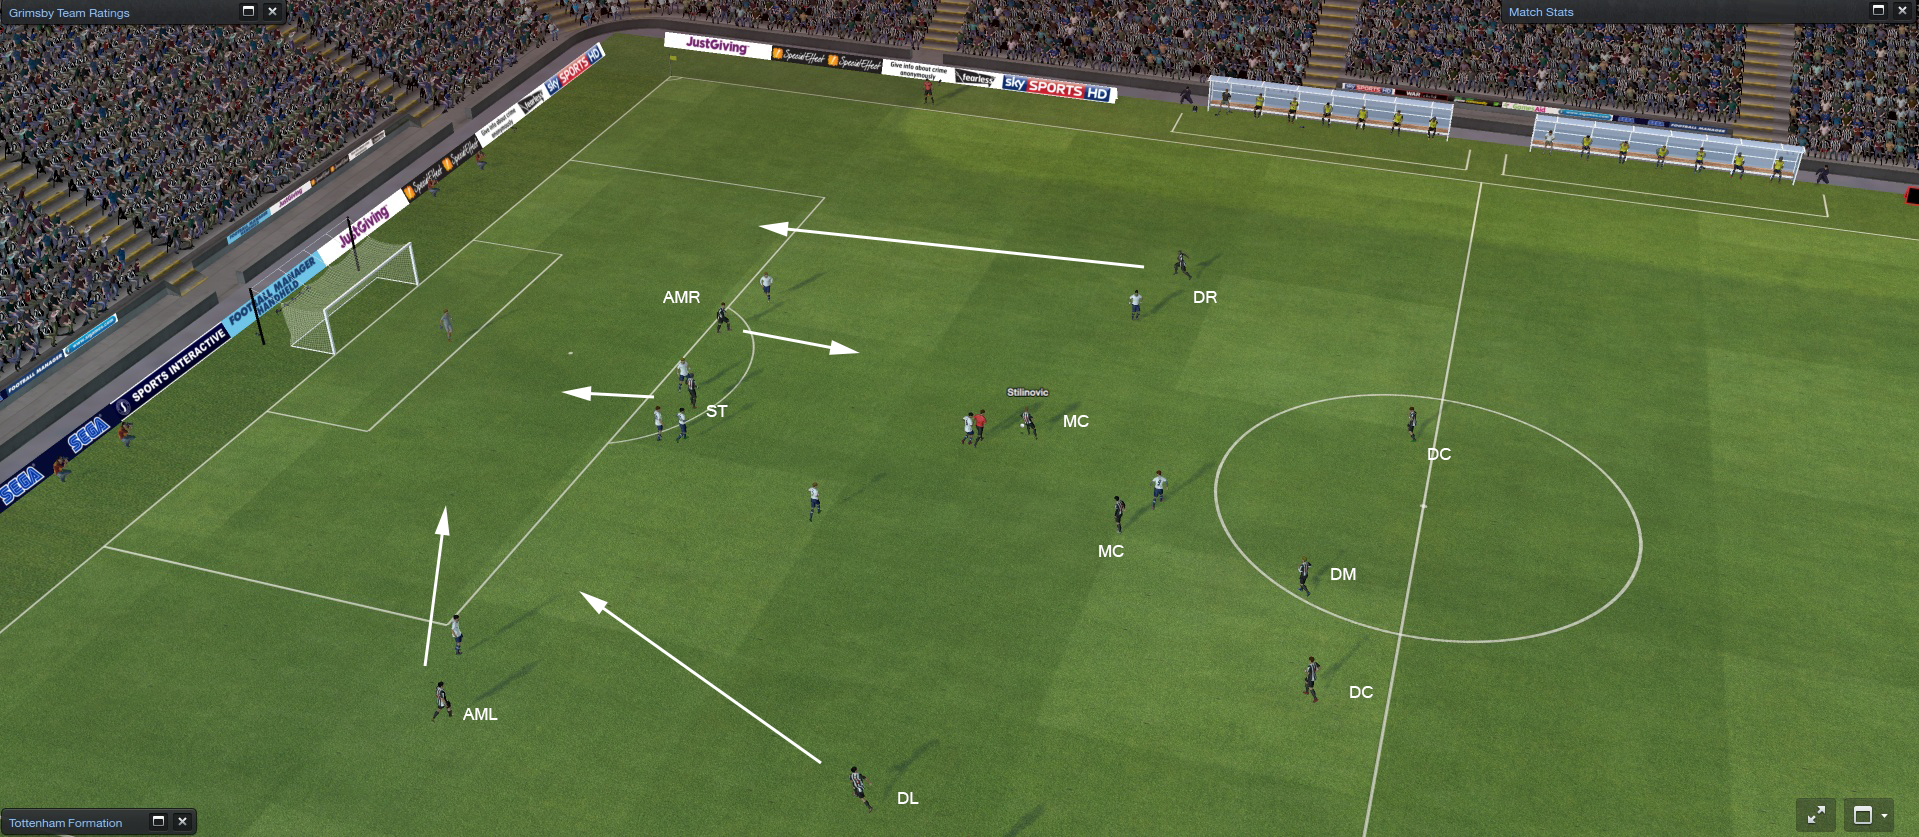
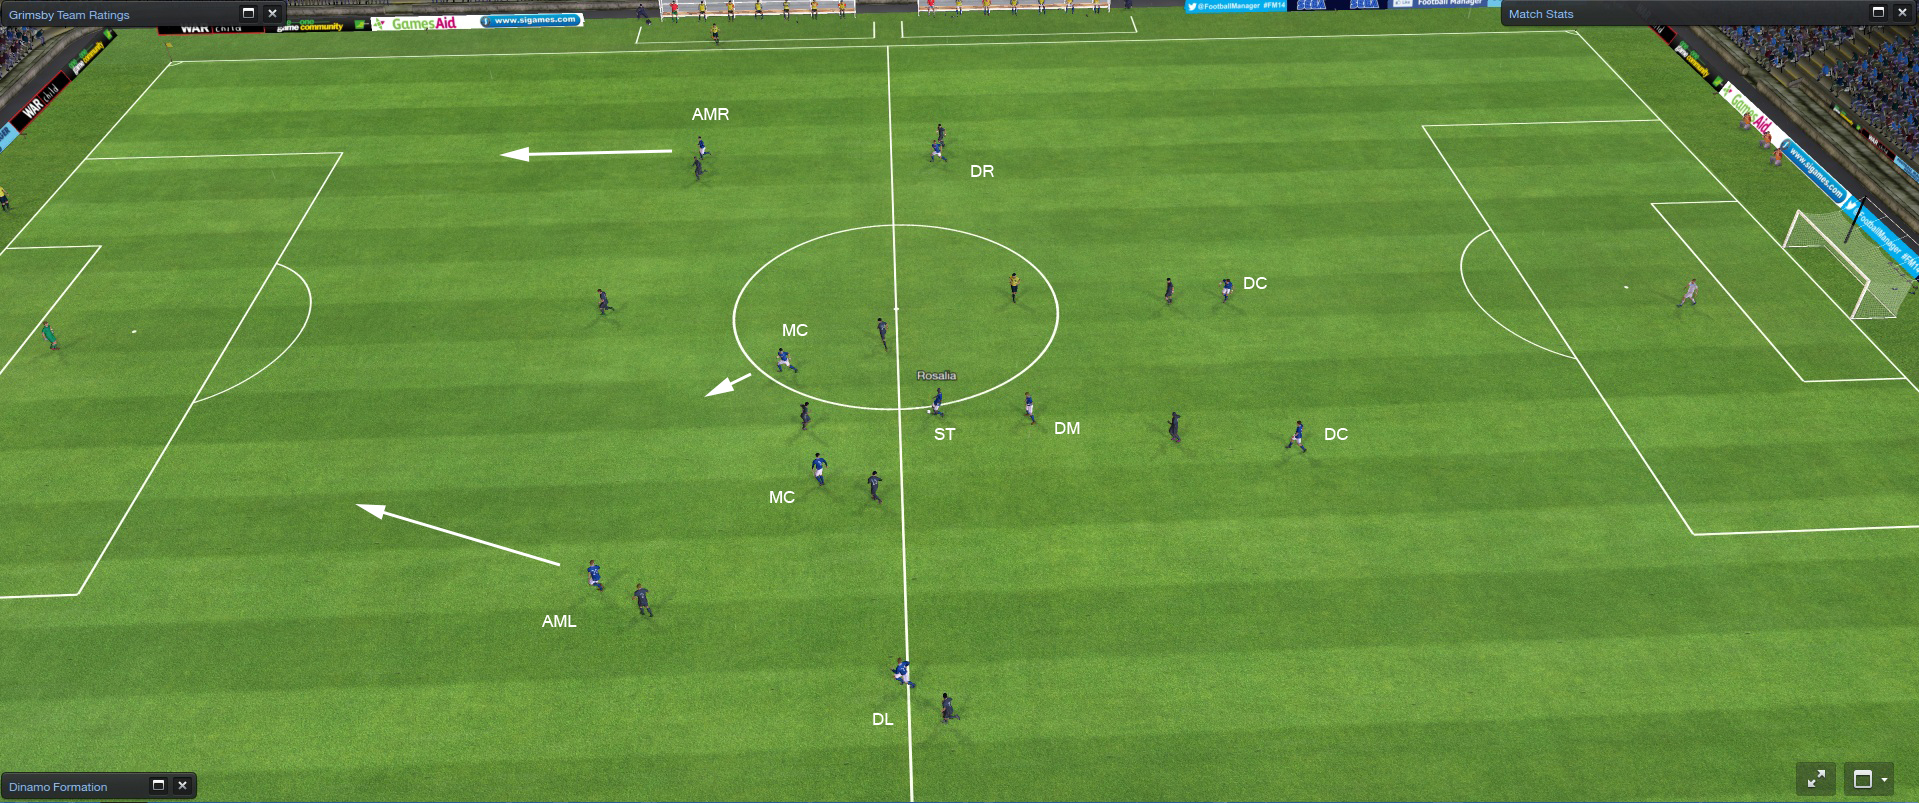
Defending
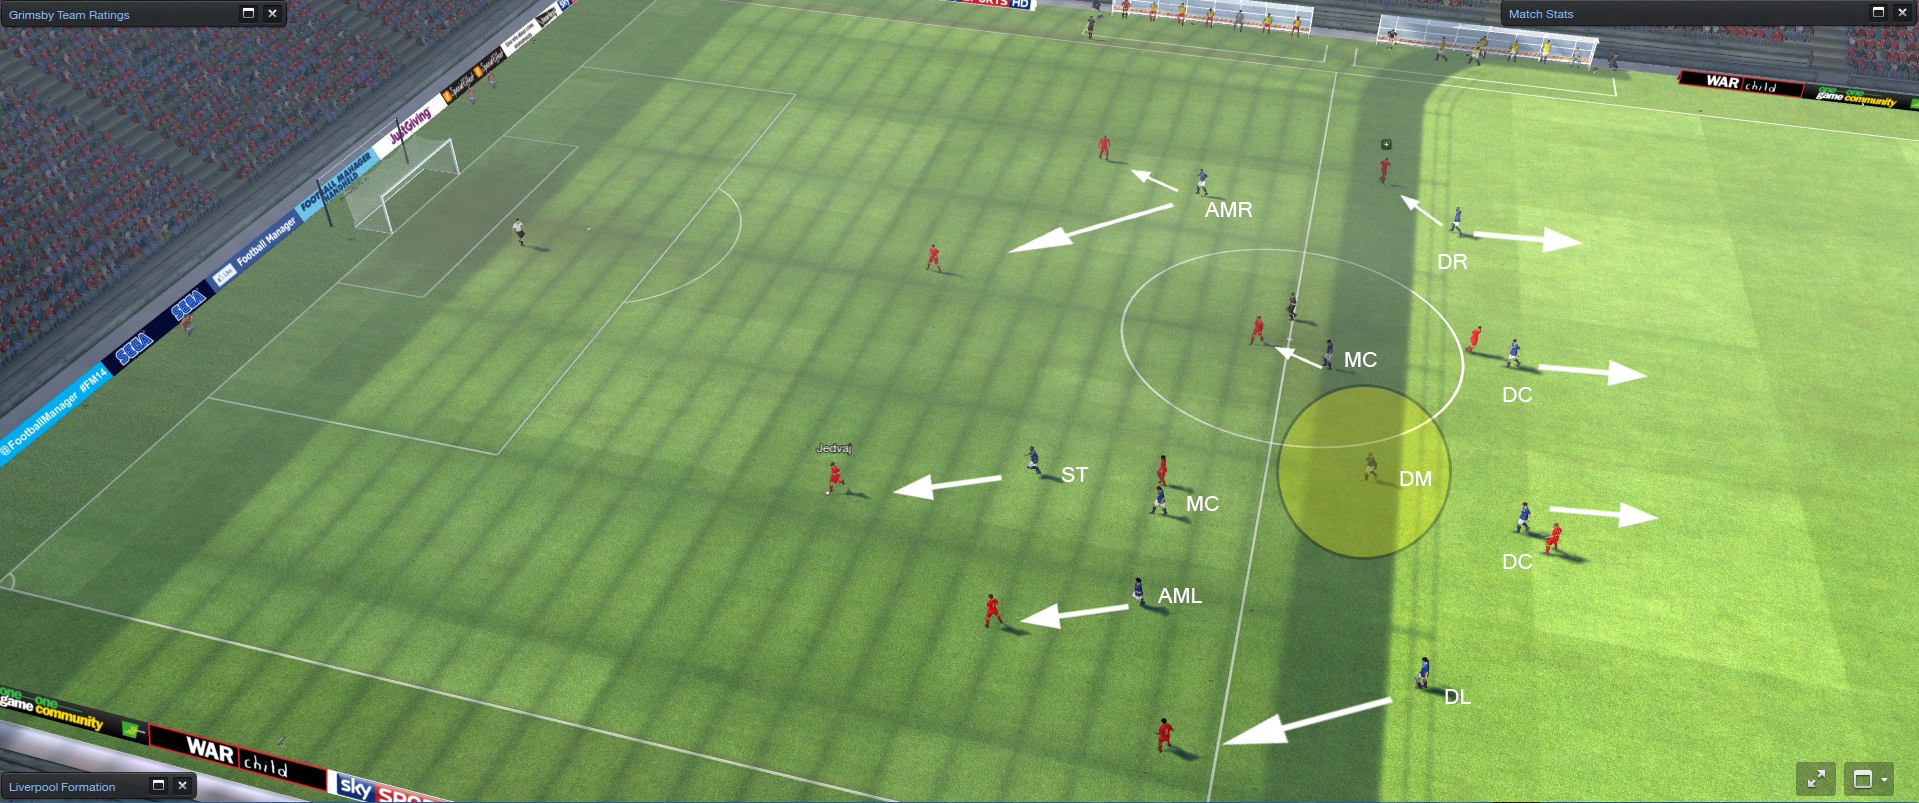
This is a picture from a game versus Liverpool, it’s a typical example on how the pressing in the tactic works. Initially the defensive line may look quite high and prone to through balls, a very skilled player may be able to pick out a pass, but not a central defender as in this case. Even if they manage to move the ball to one of their more creative midfielders, my team would have closed them down and my central defenders would have fallen deeper already.
The opposition defender in this case, has three (realistic) options.
- He can make a short pass to one of his teammates, which will result in continuous pressing from my side, and eventually we’ll win the ball in a dangerous position.
- He can make a pass home to the goalie, the goalie will then hoof the ball forward to their strikers. This will result in my central defenders winning the ball in the air about 90 % of all times or they’ve already fallen deeper to counter the threat exposed behind the defensive line. One way or another I win the ball back.
- He can try to turn around and hoof the ball to the strikers, the result will be the same as in option two.
(Obviously my team/tactic is not invincible, but this is how it usually looks against teams inferior to mine.)
Let’s take another look at the positioning of my players. All players except the defensive midfielder and to some degree the central defenders, are tracking the opposition players, marking them tightly, choking space and reducing passing alternatives. Although the most beautiful part of this picture is the defensive midfielder. Due to my advantage in terms of players in the center of the pitch, he can just roam around in front of the central defenders, covering space, making interceptions and cutting off passing routes.
Well, what happened after I took the picture? Their central defender made a short pass to their right back, my AML closed him down and won the ball back. He quickly passed a through ball to my striker that scored.
The unity and narrowness between the central midfielders and the defensive midfielder, more than often leads to the opposition focusing their passing towards the wings, where my full backs and inside forwards co-operates to counter the threat of the opposition.
Attacking
As I earlier mentioned, this tactic revolves around possession, but nonetheless it doesn’t limit the players ability to start of a quick counter attack. Therefore I’m going to show you two different examples on how it looks during the offensive phases.
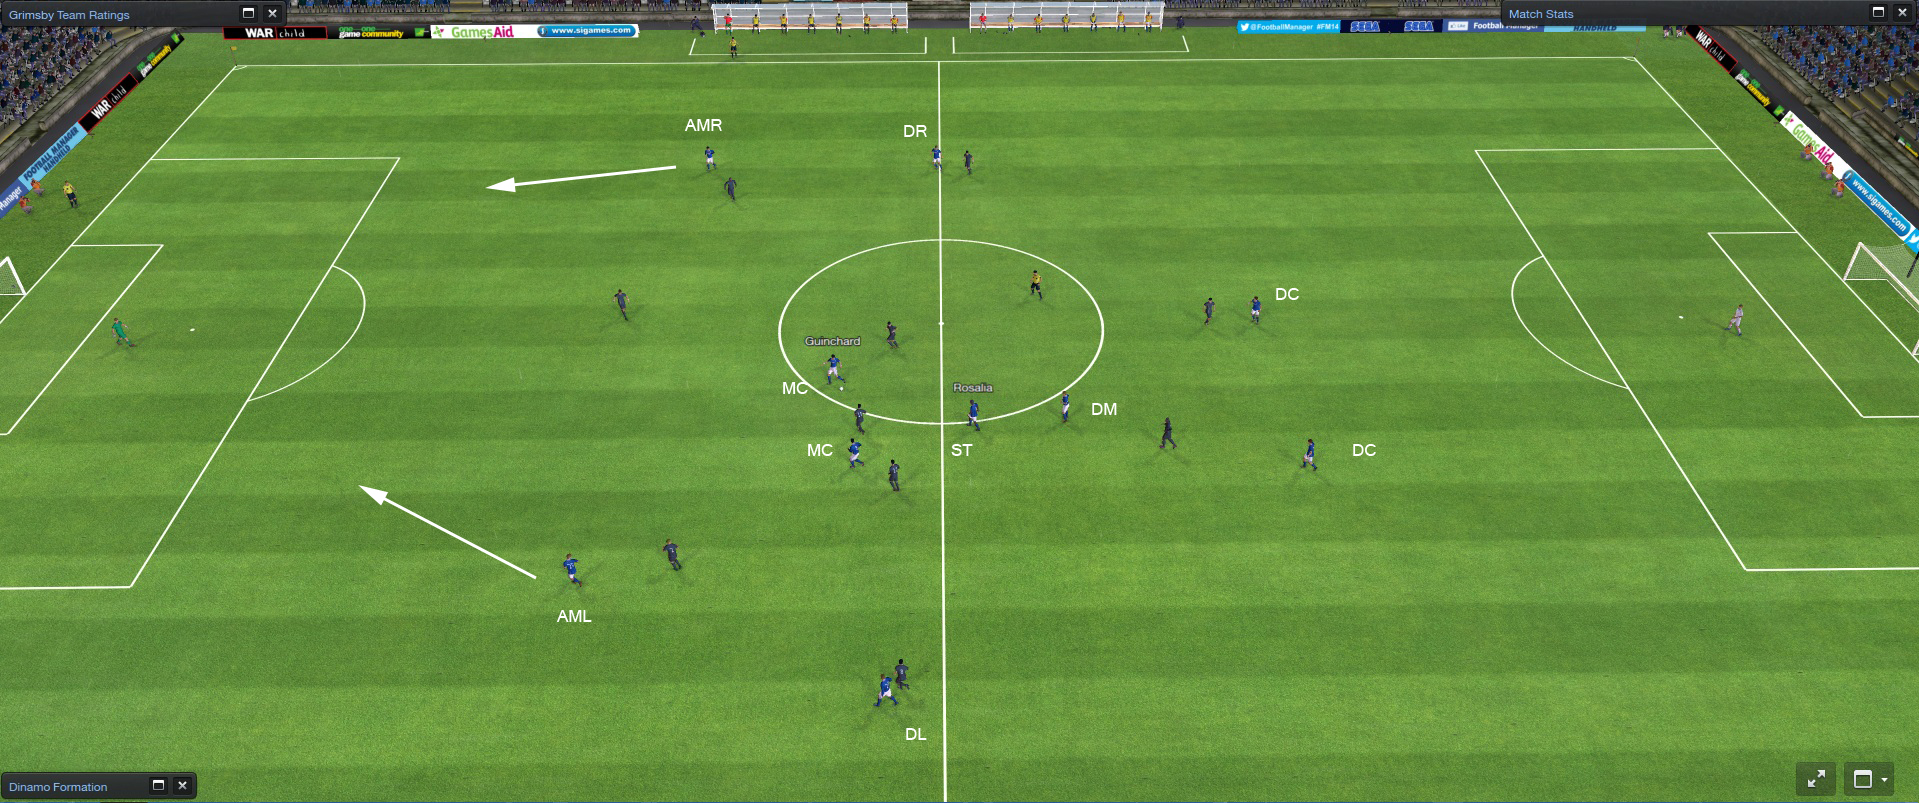
The first goal I’m going to show you is occurring in a situation where my team have had the possession for some time. They went about their business in a cautious and patient way, just waiting for an opportunity. The arrows represent the players upcoming movements.
This is the initial start of the goal sequence. My MC just picked up a pass from my AML and is looking for a teammate to pass. Take a close look on the position of my players, the AMR have dragged the opposition full back into a central position and my full backs (especially the right one) are seeing some space further up the pitch.
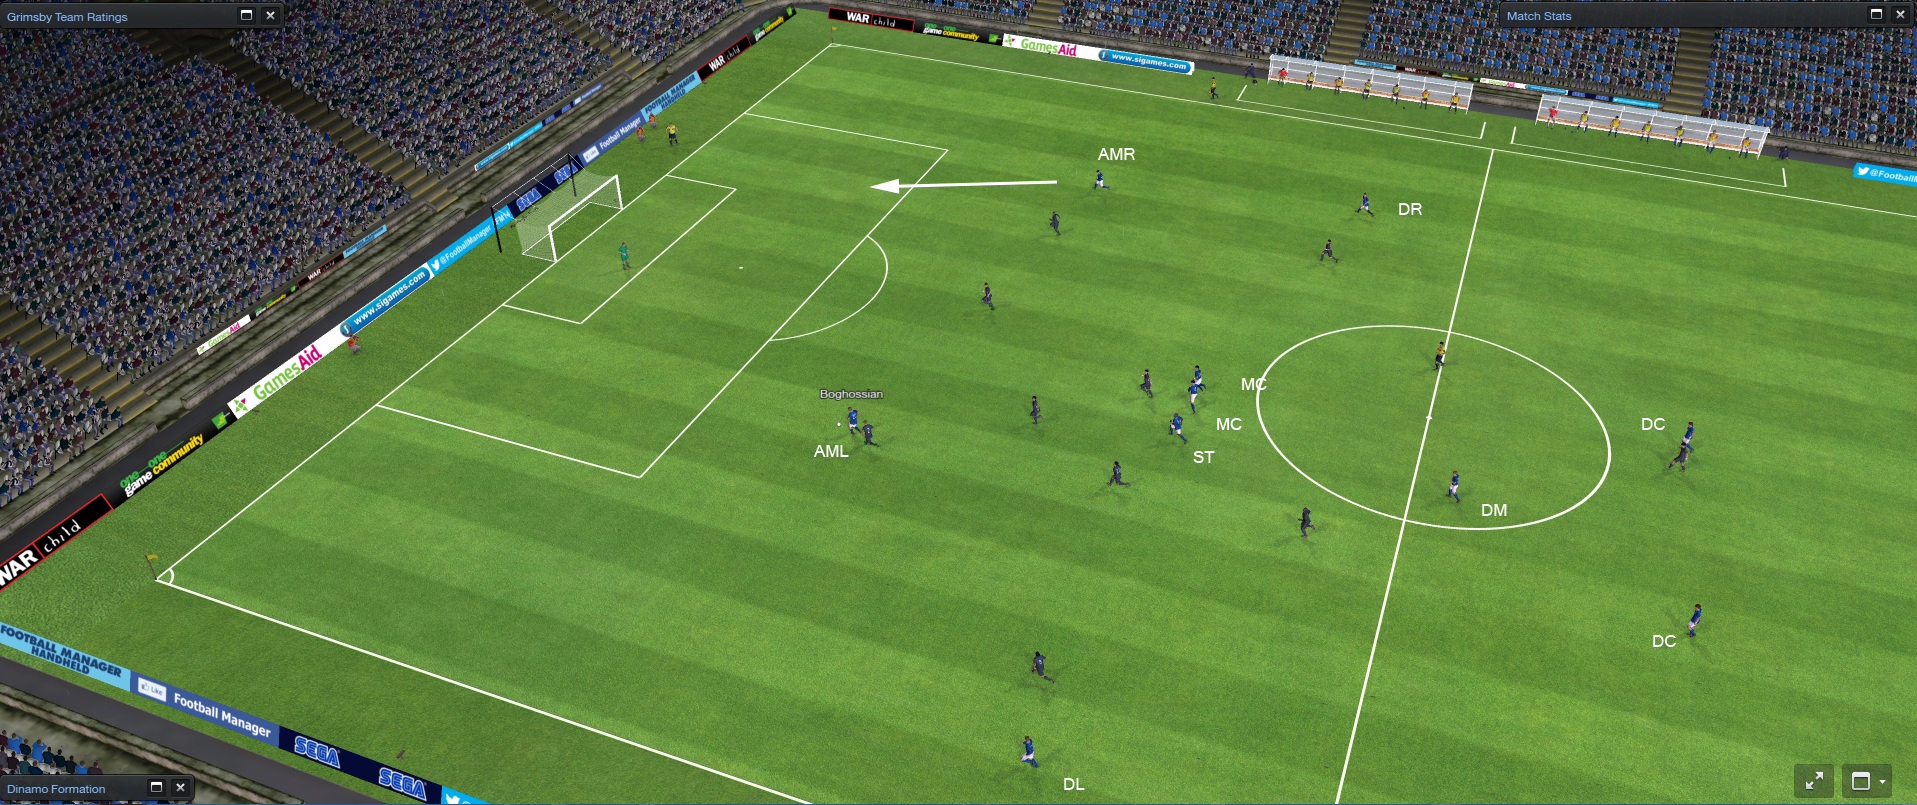
A couple of seconds later my other MC have received the ball, he quickly turns around looking for passing alternatives. The most obvious pass would be into the space in front of my DR, although the opposition full back and winger could easily cut my DR off. Instead my centrally positioned AMR comes deep to get the ball.
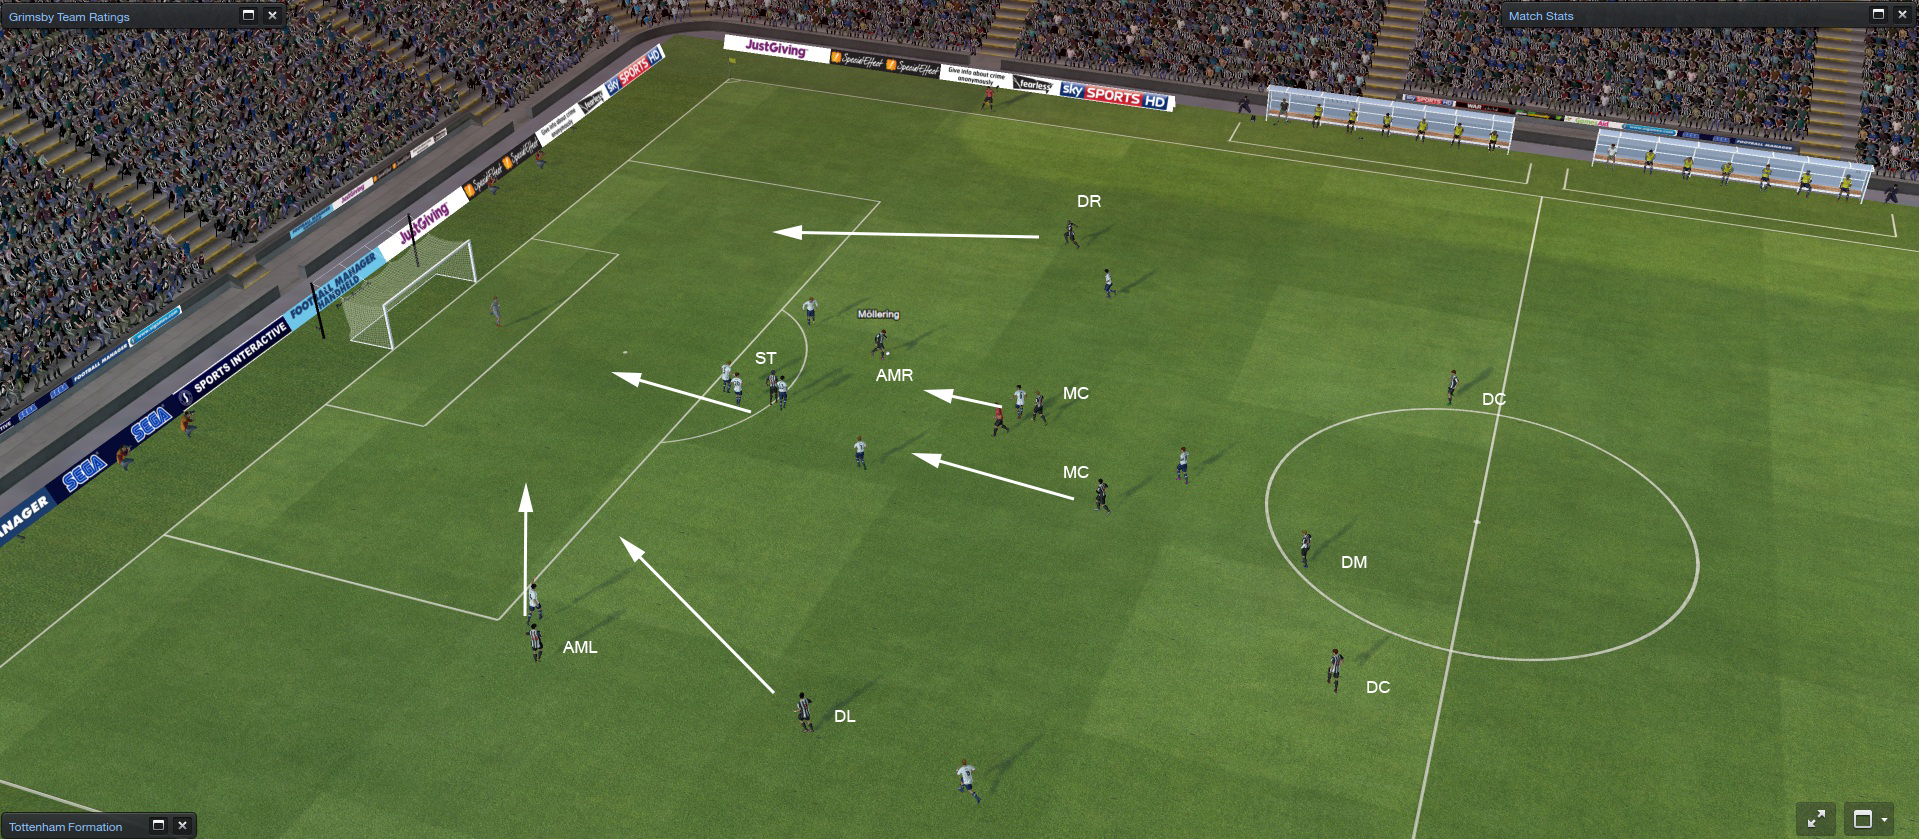
Here my AMR has received the ball. The opposition full back is still focusing on him while at the same time my DR has surged forward on the wing, sprinting past the opponents winger unguarded. Space is now wide open on the right wing, my team has realized this long before the opposition and all of my offensive players are ready to run into the box when my DR receives the ball.

Here my DR has received the ball inside the box. He now has several alternatives to make something of this attack.
- He can just score it himself (although it’s a tricky angle)
- He can pass it into the box, either to the ST or the AML (Who both will be in dangerous scoring positions in a second)
- He can pass it backward towards the end of the box to the MC who will have a great scoring opportunity.
Unexpectedly my full back actually picked option number one, luckily for me he put it in the back of the net.
This goal is a great example of what simple movement can lead to. My AMR dragged his marker out of position, opening up space for my DR to exploit. This exact sequence happens on countless occasions, usually it’s the ST who comes deep and the AMR/AML who exploits the space either on the wings or in center of the pitch behind the opposition central defenders.
The second goal I want to show you is a result of turnover in possession, in my eyes it’s beautiful in so many ways.
In this picture, my MC just won the ball from the opposition and is in the process of passing it to my other MC.
The other MC is about to receive the ball and is going to one touch pass it to the ST who is coming deep. Note that ALL my players except the defending ones have already started their runs (including the ball holding MC who is already planning his move to a more advanced position).
The ST is now the ball holder and the MC is now in a more advanced position, the MC will get the ball back. Note that there is vast amounts of space to exploit.
The MC now has two obvious alternatives, either he passes it into space in front of the AML or the AMR. Obviously my MC is a French artist ala Zidane or Platini, so of course he’s hitting the ball once again with one touch, towards the space in front of my AML.
Simple, my AML can either shoot it himself or pass it to the AMR. He fired a screamer towards the farther corner and scored.
This attack started after winning the ball in the middle of the pitch, 4 passes and 8 seconds later the ball was in the net.
This goal is a brilliant example on how efficient the counter attacking works with this tactic.
The most notable thing with both these goals, is the transition from the point of the players deciding to go forward until the attack is finished. After they realize there is an opening, it takes just a matter of seconds until a chance is created.
Results
Full table EPL
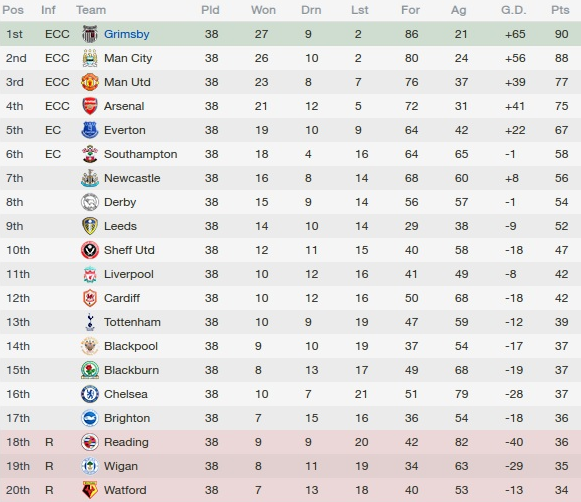
Table home fixtures EPL
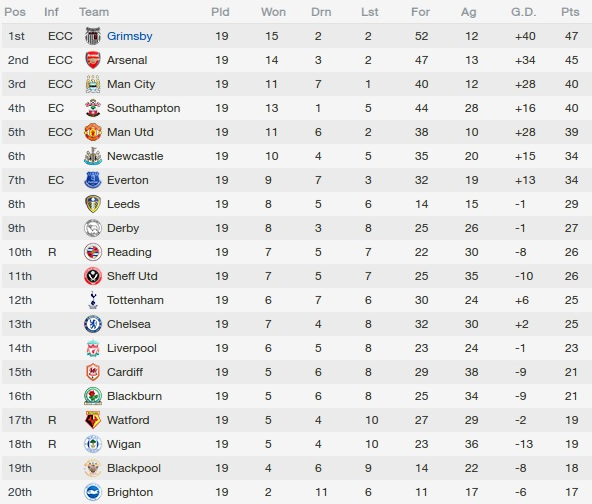
Table away fixtures EPL

I used this tactic in every game, I only made some minor adjustments. I just consider it merely a randomness that I didn’t come through clean this season. The game versus Newcastle was just hopeless. I had 4-1 CCCs to my advantage, 63% possession and they scored THREE goals on set pieces (and my defense is good on set pieces). The game versus Leeds was about the same, I had the lead until the 92th minute when they equalized, and in the 94th minute they were awarded a bloody penalty.
I went undefeated away from home, although I did draw a lot more away from home.
Statistics
Average Goals Scored: 2,53 per game
Average Goals Conceded: 0,55 per game
Average Shots For: 17,08 per game
Average Shots Against: 6 per game
Average Shots On Target For: 6,95 per game
Average Shots On Target Against: 2,42 per game
Average Clear Cut Chances For: 2,42 per game
Average Clear Cut Chances Against: 1,05 per game
Average Possession: 59,24 % per game
To be honest I was quite disappointed with the Clear Cut Chances Against at first. Although I looked through it and noticed I actually went quite clean through long periods when it comes to CCCs against. Sometimes my team just had a fucking meltdown and suffered a couple too many CCCs, but nothing to worry about.
Obviously my tactic isn’t flawless or anything, but I’m pretty proud of it, especially when it comes to the increased counter attacks produced in comparison to my tactic last year.
However I’ve had some struggles when creating it. Most notably I haven’t really been able to make my striker perform regularly. I’ve changed roles between Complete Forward (S), Deep Lying Forward (Support/Attack) and False Nine.
Important Notes
- When my opponent plays with three central midfielders (AMC excluded), I remove the instruction ‘Play Narrower’.
- When my opponent plays with only one player on the wing on each side, I Use the ‘Exploit The Flanks’ instruction, although I don’t remove ‘Play Narrower’.
- I have a good assistant manager with great tactical knowledge, therefore I often let him do the opposition instructions, but I never adjust anything that makes my central defenders press more, they should stay in position. When my assistant manager isn’t available, or in certain situations where I want to do the opposition instructions manually, I put pressure on the opponents defensive line, I put pressure and tight marking on the opponents central midfielders, all wingers, strikers and technical midfielders I show to weaker foot.
- I very seldom change strategy, not even in difficult away games since I’ve figured the pressing play doesn’t work as well with a more cautious approach, and the closing down is the most important aspect of the tactic. Although you should consider I have a great team, if you’re playing with a lesser team, a more cautious approach might be beneficial in certain games. (I haven’t really tried it with a worse team than mine so)
- Consider that the tactic is based on possession, therefore the team will need more time to get used to it. So focus solely on tactics only in match training in the beginning.
- This tactic is not made to work for bad teams. Your players need high creative and technical abilities.
- This tactic is created with patch 14.2.2, I can’t guarantee that it’ll work as well with the new patch, 14.3.0. I have tested the tactic in the newly released patch and spontaneously it seems to work just fine. It does seem to be a bit more vulnerable to through balls but chances created seems to have improved as well.
Best FM 2014 Tactics: Screwby’s 4-3-3
If you like what you see, then just click the download image below and download the file from mediafire. Then follow the instructions.


- Once download is complete, move the file to the following folder documents>sports interactive>football manager 2014>tactics
- Now load the game as normal and enter the tactics screen.
- Click the button to add a tactic and look in ‘archived tactics’, then select ‘UNCHAIN THE WOLVES’.
Thank you for your time and I really hope you enjoyed reading this tactical post. If you have any questions don’t hesitate to comment below or contact me on twitter @screwby666.